Dream a little dream of smoky
Your long-awaited request is finally granted. Everyone wants a piece of my Let It Smoke smoky eye makeup.
But you know what, you definitely won't see me wearing that in real life, unless on special occasions such as Halloween. I mean seriously, who will need that kind of heavy eye do everyday?
I did the Let It Smoke makeup simply for the sake of photo shooting. Ok, I admit, also to wow you guys about my makeup skill but personally, I prefer a sweet, and a little, just a little sexy look.

Just like this ❤❤
What you are about to see is a "versatile" yet dreamy makeup that you can wear everyday to college, to work, to date, to shop or simply to make yourself feel good. It's easier, simpler and less smoky compare to Let It Smoke but it's sophisticated enough to catch others attention ;)
Important notes!!!
1) Always remember to start off with clean face, follow by toner, moisturizer, sunscreen or anything necessary.
2) When working on makeup that emphasize the eyes, opt for a good foundation and concealer. That will help give you a flawless touch, eventually it brings more attention to your eyes.
For this tutorial, I start off with Make Up Forever HD liquid foundation, Amazing Concealer and Laura Mercier Loose Powder.
Firstly, apply the eyeshadow primer to make the color last longer and to avoid it from smudging. I'm using Urban Decay Shadow Primer.

Then, pick a light brown color to slightly define your brows. A little goes a long way. Do not overly define your brows because we want a dreamy look. I'm using Coastal Scent 88 Warm Palette.

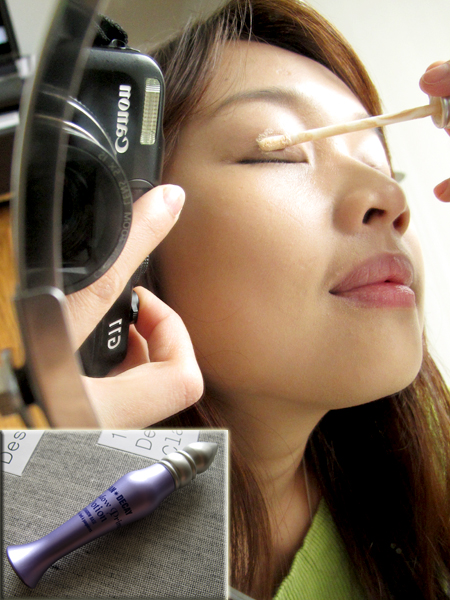
Choose a champagne color to highlight the brow bones and lids. I'm using my all time favorite Mac eyeshadow, Jest.
** Pardon my weird expressions. It's really hard to take a real good picture while you were busy painting your eyes @.@ Just bare with me.

Apply dark brown color on the outer corner. Do not attempt to create a "V" shape or bring it upward, simply follow the shape of your eyes.
Now, blend these two colors by bringing the champagne to the dark brown. It's easier to control the tone in that way.

By using the eyeliner brush, apply black color eyeshadow as eyeliner. For this tutorial, I try to use minimal amount of black. You can always put more if you prefer a smokier one.

Draw a thin eyeliner closer to your lash lines. Here I'm using Revlon Colorstay Liquid Liner.

Use a Q-tip (Yes, I got a pink one) and dab it with the Champagne color that we just used. Apply it on the tear ducts.

Now, it's time to curl your lashes! I'm using Maybelline lash curler which I'll definitely NOT recommend. I'll grab a new one from Shu Eumura when I have time to shop.
** Yup, I put the kitty cellphone charm on my lash curler. Love the sound of the tiny bell every time I touch it ❤❤

Then, pick your falsies! I use the half-cut falsies, why? Always remind yourself about the magical word, D.R.E.A.M.Y~~

Apply mascara on the upper and lower lashes. I'm using Loreal Telescopic Explosion Mascara here.

Create the never-go-out-of-style cheeks look by lightly brushing through your apple cheeks. Clinique blush, 108 cupid.
Last but definitely not least, apply lip balm or lip gloss and you are all set!


It's now your turn to wow everyone!
Happy Makeup-ing ❤❤
XOXO,
Bev
But you know what, you definitely won't see me wearing that in real life, unless on special occasions such as Halloween. I mean seriously, who will need that kind of heavy eye do everyday?
I did the Let It Smoke makeup simply for the sake of photo shooting. Ok, I admit, also to wow you guys about my makeup skill but personally, I prefer a sweet, and a little, just a little sexy look.
Just like this ❤❤
What you are about to see is a "versatile" yet dreamy makeup that you can wear everyday to college, to work, to date, to shop or simply to make yourself feel good. It's easier, simpler and less smoky compare to Let It Smoke but it's sophisticated enough to catch others attention ;)
Important notes!!!
1) Always remember to start off with clean face, follow by toner, moisturizer, sunscreen or anything necessary.
2) When working on makeup that emphasize the eyes, opt for a good foundation and concealer. That will help give you a flawless touch, eventually it brings more attention to your eyes.
For this tutorial, I start off with Make Up Forever HD liquid foundation, Amazing Concealer and Laura Mercier Loose Powder.
Firstly, apply the eyeshadow primer to make the color last longer and to avoid it from smudging. I'm using Urban Decay Shadow Primer.
Then, pick a light brown color to slightly define your brows. A little goes a long way. Do not overly define your brows because we want a dreamy look. I'm using Coastal Scent 88 Warm Palette.
Choose a champagne color to highlight the brow bones and lids. I'm using my all time favorite Mac eyeshadow, Jest.
** Pardon my weird expressions. It's really hard to take a real good picture while you were busy painting your eyes @.@ Just bare with me.
Apply dark brown color on the outer corner. Do not attempt to create a "V" shape or bring it upward, simply follow the shape of your eyes.
Now, blend these two colors by bringing the champagne to the dark brown. It's easier to control the tone in that way.
By using the eyeliner brush, apply black color eyeshadow as eyeliner. For this tutorial, I try to use minimal amount of black. You can always put more if you prefer a smokier one.
Draw a thin eyeliner closer to your lash lines. Here I'm using Revlon Colorstay Liquid Liner.
Use a Q-tip (Yes, I got a pink one) and dab it with the Champagne color that we just used. Apply it on the tear ducts.
Now, it's time to curl your lashes! I'm using Maybelline lash curler which I'll definitely NOT recommend. I'll grab a new one from Shu Eumura when I have time to shop.
** Yup, I put the kitty cellphone charm on my lash curler. Love the sound of the tiny bell every time I touch it ❤❤
Then, pick your falsies! I use the half-cut falsies, why? Always remind yourself about the magical word, D.R.E.A.M.Y~~
Apply mascara on the upper and lower lashes. I'm using Loreal Telescopic Explosion Mascara here.
Create the never-go-out-of-style cheeks look by lightly brushing through your apple cheeks. Clinique blush, 108 cupid.
Last but definitely not least, apply lip balm or lip gloss and you are all set!
It's now your turn to wow everyone!
Happy Makeup-ing ❤❤
XOXO,
Bev